Tips on underwater photography

Dear upcoming underwater photographer,
This is certainly not a short post. Unfortunately the most important things in underwater photography cannot be explained in three lines. But if you take the time to read these tips, you will not have to make many negative experiences, save a lot of money, get good pictures faster and get sympathy points instead of Shitstorms…
As a good underwater photographer, it is now essential not only to know the technique of underwater photography, but also, at least as importantly, to know its knigge.
Knigge of underwater photography:
  1. Be aware that at most dive sites around the world, no one will dance a jig when you introduce yourself as an underwater photographer/filmmaker. This is the hard and naked truth!
    Because most guides plan the dive in a way that they swim at least 1 km in a 50 minutes dive and want to show you at least 10 scorpionfish and 10 nudibranches. The fact that you want to photograph only one scorpion fish, but this properly (from all sides, with every possible exposure) and you need at least 10 minutes for it and the nudibranch doesn’t interest you at all (because no macro lens mounted) understands neither he, nor your ad hoc assigned buddy! If he doesn’t take pictures himself, he will never understand why the whale shark is great on one dive and flop on the next and you instead search every gorgonia centimeter by centimeter to finally get a pygmy seahorse in front of your lens.
    Therefore, whenever possible, my underwater photography holidays go to places where the guides know how to deal with photographers (e.g. one guide and two or three photographers) or to places where I’m aloud to dive with my buddy/model without guide. This way I don’t annoy non-photographers or for little money hard working guides. And yes, these diving destinations really exist! Look for destinations that have camera rooms, offer underwater photography workshops or ask for at your travel agency.


  2. Once you have found such a destination, keep a perfect buoncy at all time, in every situation and know your diving equipment and its operation by heart before taking a camera to dives. The Check-Dive and rental diving equipment combined with a rental camera are the guarantee for stress under water and lots of useless photos.
    This tip of course also applies to all filmers, GoPro-users or similar. The fragile underwater world and the next divers will thank you!


  3. Be considerate of other divers when taking pictures or movies. Even if they cannot or don’t want to take pictures or a movie of the nudibranch, they definitely want to see it.

  4. Underwater photography requires a high degree of self-reliance and tolerance but also from your buddy. While your underwater world takes place within a few centimeters on a screen, your buddy is forgotten all too quickly and literally gets ‘out of focus’!
    So talk to your guide and your buddy about your (photography) plans before the dive. This helps to avoid misunderstandings regarding dive planning and can save your life under certain circumstances. Because if you turn up several hundred meters away from your group because you dived only quarter of the planned distance, nobody will look for you there unless your guide and the boat know about your plans. When I take pictures, I listen even more carefully to the briefing, because me and my buddy are usually diving quite far away from the guide and the group on our own.


  5. Understand and respect the underwater world. Where can I find what? How does marine life behave. How far does the ‘comfort-zone’ of a particular fish reach? If you can make yourself interesting for it, it will might even come to you. If you chase it or swim fast towards it, it will swim away and never come back. Do I have the possibility to capture the subject of my choice with my camera in first place (macro lens and whale shark or fisheye and pygmy seahorse)? If not, take a quick look and let others with the appropriate equipment take their photo.

  6. Swim away from the subject after a few shots, give others time to take their shots as well and check your shots on the camera screen during this time. Remember also that the strobe or photo light itself means extreme stress for many animals, they may even become blind for a short time and thus an easy prey for hunters.

  7. During your dive, risk a look at the underwater world without looking through the viewfinder. Sometimes, perfect snapshots are taken spontaneously while diving past And your buddy, who is desperately trying to tell you she/he’s at 50 bar, will thank you for it.

  8. And last but not least: diving safety before photography! Always be prepared to hook your camera or to put it down in case of emergency to help your partner!

And now to the technical part of underwater photography:
  1. Choose your photographic equipment carefully. Underwater housings are expensive and almost always fit exactly on a single type of camera. Often it even makes sense to get a spare camera body while it is still sold. If your camera is broken or needs to be replaced, a new underwater body for the successor quickly costs several thousand Euros, while the second camera body is usually available for little money as soon as the successor is in the stores.
    Think twice and buy only the lenses you really need. For underwater photography I use a fisheye 16 mm, a zoom wide angle 18-35 mm (for fish portraits and as a ‘I can’t think of anything smarter’ lens), a wide angle 35 mm fixed focal length for fish portraits and a macro 105 mm with a MacroMate flip lens to achieve an image scale of 2:1 for the smallest creatures.


  2. Know your camera, its limits and settings and practice on land and in the pool. Save, if possible presets for the most used settings. Complex settings in the menu are already strenuous on land, but almost impossible under water at a depth of 25 meters. Try different apertures, shutter speeds and strobe settings on the same test subject under the same conditions and compare the results.

  3. Check your camera for proper function directly before each dive! Is the housing properly sealed? Is the hot shoe for the external strobe correctly plugged in? Do the strobes fire and is the exposure of the test photos correct? Is the focus switch on the lens set to automatic and not manual? Many lenses cannot be manually focused under water and the switch is inaccessible once the camera is mounted in the housing and the port!

  4. Go as close as possible, but stay as far away as necessary to not frighten animals away. Photos of fleeing creatures do not win prizes and annoy your fellow divers. Never forget that the light of your strobes has to cover the distance twice; from the flash to the subject and back to the camera. At distances of more than two to three meters to the subject, red is already filtered out, the images become flat, have little contrast and a bluish tint.

  5. Take your time when approaching shy marine life. Approach from below and always leave them a way for an escape. We are intruders in their world and their territory. After some time they get used to you and even ignore you if you do not behave threateningly. And what applies to portraits above the surface also applies under water; nobody likes to be photographed from behind. Note the perspective and the golden section. Do not take pictures from above but at eye level.

  6. Once you have found the subject for your picture, take your time. Position yourself correctly and take more than one shot. Especially in macro photography it often happens that a floating particle in the water gets between the camera and your subject and makes the shot unusable or the focus is set on an incorrect focus point.

  7. Consider the weather, the position of the sun (time of day) and the swell when choosing a lens. Bad weather without sun and poor visibility are usually irrelevant for macro photography, since there is enough light from the photographers strobe or light and there is little water between the camera and the subject. On the other hand, strong currents or swells noticeable under water make reasonable macro photography almost impossible. Wide-angle and fisheye photography of reef scenes is best done with lots of light, most beautifully with brightly shining sun producing rays in the water. However light plays under water an important role. Therefore it is also very important to check the position of your external light source(s) before every shot. For wide-angle photography, the v-positioning is the right choice for many situations (flashes illuminate the subject from diagonally upwards to downwards and from the side outwards towards the front). This creates the impression that daylight illuminates the subject and the picture looks more natural. For macro photography, the strobes or the strobe is often positioned close to and at the height of the camera lens. However, there are hardly any limits to the positioning of the external light source(s) and it is worth experimenting with.
    Special attention should always be paid to the so-called backscatter (particles, which were involuntarily illuminated by the strobe or the light and appear as disturbing white dots/’snow’ on the picture). It is therefore important to illuminate as little water as possible directly between the camera lens and the subject. If possible, only the subject should be illuminated. Unfortunately, backscatter is invisible on the usually relatively small camera screen and only stands out during post-processing. But then it is also too late to change the position of the light source and often the images are then unusable…
    Backscatter


  8. If possible, do not take pictures facing your camera downwards. 99% of the images I had photographed with a downward-facing camera went straight in the virtual trash. They are dark and look cold. If possible, align your camera against the water surface.

  9. Always take pictures in RAW format, if your camera allows. Only then can you make the white balance and many other fine corrections during post-processing lossless on the PC.

  10. An important part of the photo equipment is in the age of digital photography the PC/Mac and the associated software for the ‘development’ of the images. If you buy e.g. a Nikon D850 and take pictures in RAW, even with the function ‘loss-free compressed’, every image files of over 50 MB (and everything else doesn’t make sense, because only with RAW certain settings can be made afterwards and with the format JPG the quality decreases every time the image is saved again)! This has to be considered when selecting the hard- and software. Otherwise, even the simplest changes to the image become several-minute task and the windows circle or the ‘beach ball’ no longer stops turning.
    Which image editing program is used is a matter of taste. Fact is that few programmes are constantly being developed and they all have their strengths and weaknesses. Personally, I recommend Adobe Photoshop or DXO Photolab for editing, and for editing and archiving Adobe Lightroom. The chapter on post-processing and its possibilities is so important today that entire courses and seminars are offered for this purpose alone. More detailed information on this would go beyond the scope of this website.


  11. The last tip concerns the settings. Unfortunately, there is no ‘recipe’ for the perfect picture. Each camera has its strengths and weaknesses and its recommended field of application. I photograph underwater almost exclusively with manual settings, apart from the strobe lighting. In principle, the following applies:
    ISO: Underwater, one often encounters so-called ‘low-light situations’. Daylight, which is transferred through the water, is partially filtered out and a twilight atmosphere is created. It’s useful here to have a camera with an auto focus which locks in even with little contrast and which produces usable pictures with high ISO numbers. But be aware: Higher ISO numbers reduce the dynamic range (the ability of the camera to show the entire color spectrum) and the image noise increases.

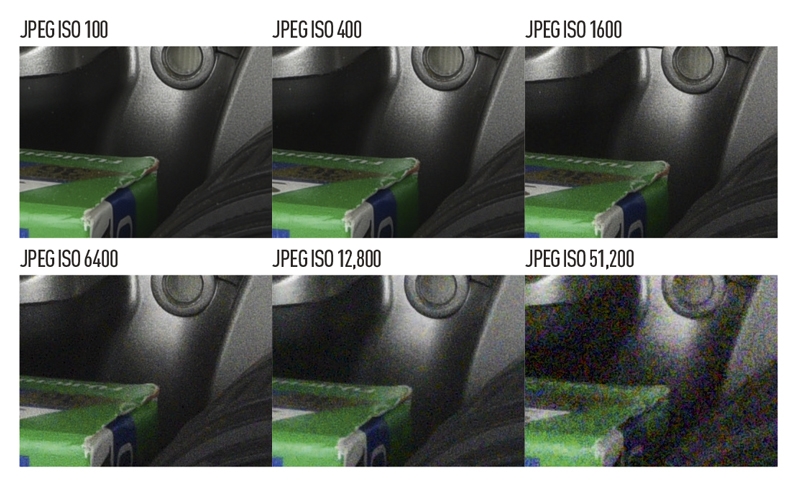
    Image noise of the Nikon D750 at different ISO numbers

    This means: ISO numbers as deep as possible but as high as necessary. In macro photography, this is rarely an issue. In wide-angle and fisheye shots, the ambient light is a crucial factor and makes the images worth seeing.
    Shutter speed: Unlike on land, underwater sharp pictures with a shutter speed up to 1/80 sec. are possible without a tripod because the waters high density works stabilizing (unless the subject itself moves too fast). (unless the subject itself moves too fast). For moving motifs such as schools of fish, however, 1/100 sec. is as good as it gets After that, blurring is already created by the movement. When working with external strobes, the maximum strobe sync time is usually 1/250 or 1/200 sec. With shorter shutter speeds, strobes in TTL mode will no longer function correctly. When the semi-automatic mode ‘S’/’Tv’ is used, the shutter speed is set to a fixed value and the correct aperture value is calculated by the camera.
    Aperture: The aperture is a creative element in macro photography and directly influences the range, which is sharply displayed. Higher aperture numbers result in a greater depth of field and thus make more of the image appear sharp. Smaller aperture values reduce the sharp area and can thus focus the eye of the viewer specifically on one point.

For wide angle and fisheye shots, I usually use a quite high aperture value. Experience shows that I achieve the most beautiful blue with aperture 16 with my Nikons. Of course, there must be sufficient light for this, that the exposure time of 1/80 sec. is sufficient. If the mode ‘A’/’Av’ (automatic shutter speed) is used, the aperture will be set to a fixed value and the camera will calculate the necessary shutter speed for correct exposure.
Important!: The screen brightness of the camera must be set correctly. A camera screen set too bright easily leads to underexposure. This is a detail that is often forgotten, especially during night dives. Take pictures rather underexposed. Today’s PC/Mac post-processing software makes it easy to brighten a dark image. Overexposed areas are simply white and remain so even with the best software, because they no longer contain any color information. Dark areas contain a lot of image information and can be easily brightend and will reveil a lot of detail. If you have a histogram view available, use it and pay attention to the so-called clipping. My cameras have a ‘High Lights Indicator’ when displaying the image. The areas without color information on the camera screen blink white and indicate the overexposed areas. Use then a shorter exposure time, a higher aperture value, or reduce the ISO number.

And now enough of the theory, because it’s like many other things in life, practice makes perfect!